Saturday, 25 April 2009

In go the brassicas


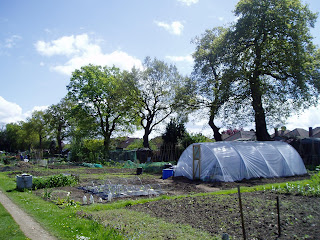
Sometimes this allotment lark gives you a great sense of achievement. This week has seen me plant up the brassica patch with cabbages, broccoli, and cauliflower. A little rooting around at the back of my plot also turned up some chicken wire and some freecycled water pipe. Some head scratching and a couple of hours later and i had 3 mesh tunnels to act as pigeon deterrents.

I'm not sure what's more satisfying, knowing that the plot is coming together or actually discovering that i have hidden practical skills!


Wednesday, 15 April 2009

Peppers are go.


Yesterday was a momentous day in the tunnel. At last i have been able to plant 10 of my peppers into their final positions without a hitch. once again I'm using lines for support and I've stuck with using sunken pots in the soil bed for efficient watering, hopefully this should minimise water loss and surface root growth.

I'm hoping that the spacing of the plants won't create too many problems but with 16 Ferline F2 tomatoes, 8 Cucumbers, 5 peppers, and 5 Chilis I'm starting to run out of room!

Saturday, 11 April 2009

The Inner space - update


The last few days have seen quite a change inside the tunnel. I've attatched some support lines to the frame for the tomatoes and and have altered the path layout to allow me to get into the corners.


Outside has seen me finish off the polygutter with a wombled piece of dowpipe and a recycled barrel for water collection. A quick trip to Guildford Marine also provided a cheap bilge pump to allow me to pump the water to where a want it. With any luck and the current state of rain I hope I can have a full 240 litres ready for the the summer months.

At home things continue to grow in the potting shed -formally known as the lounge- at an alarming rate, it's nice to know that the nurturing instincts of the Rascal include the curbit family too.


That's all for today folks.

D

Tuesday, 7 April 2009

Water + plastic + canes + tape = a DIY Gutter


The last few weeks have seen me chew over the ins and outs of many water collection designs for the tunnel. Most of the commercial solutions won't work due to the lack of vertical sides on my tunnel so I’ve come up with my own design.

The plan:


Use the off cuts of polythene left over from the constructing the tunnel to create a lightweight polythene gutter.

step 1. Lash together bean canes to create the side support for the polythene gutter.

step 2 wrap the polythene all the way round the canes once an
d secure to itself using tape.

step 3. drive 3 sets of supporting canes into the ground ne
xt to the tunnel to support the side cane.

Step 5. place the side cane onto the supports and make sure that any rain will run in the direction that you need it to.

step 4. Attach the side of the gutter nearest the tunnel to the cover with Polytunnel repair tape. (use a dual layer - make sure that pieces used to make the the top layer seal over the joins of the bottom layer - like roofing tiles)

Step 5. Test the gutter using a watering can and place the butt where the run off can be collected.

Step 6. drive a stake into the ground at an angle under the middle of the side support to prevent sagging.

Step 7. (optional) place weights inside the gutter to ensure that it keeps it shape during blustery conditions.


Step 8. wait for rain!

Sunday, 5 April 2009

Experimenting with fruit


Last September i went on a local apple hunt to find fruiting trees with great flavour. I found several ancient trees located near to one another and decided to try to raise my own apple variety.

Several apples later and some invaluable help from FB and I'm glad to report that I've had some success. Whilst i won't have a fruiting tree for 4 years (3 to go) i now have 15 apple seedlings.
There's something quite magical about seeing seeds that you planted poke their heads through the soil 6-8 months after they were sown. It's fair to say that this may all end in tears but regardless of the flavour I'll be proud of any tree that i raise.

Here's to wishful thinking

Friday, 3 April 2009

The Inner Space


The inside of the tunnel is now completed. Due to the shape of the tunnel The S-like path should allow more plants to be grown in the middle of the tunnel and thus make the most of the tunnels height.

Tomatoes, corn and other tall produce will make up the middle growing beds with low lying vegetables like squash, carrots and herbs nearest to the ground level polythene.
In an effort to make the most of the soil beds i hope to be able to grow peppers, chillies and other mid height plants under the taper of the sides, here's hoping that I'm not being too ambitious too early!

Enjoy the pictures.

D